VMware ESXi 6.0.0の仮想マシンでKVMを動作させるための設定
目次
概要
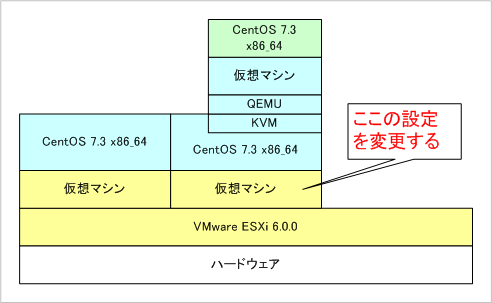
VMware ESXi 6.0.0の仮想マシンでKVMを動作させたいとき、デフォルト設定では動作しませんでした。 KVMはCPUの仮想化支援機能(Intel VMもしくはAMD-V)を利用できることが前提になっています。 ESXi 6.0.0の仮想マシンのCPU設定ではこの仮想化支援機能(Intel VT)がオフになっていたためです。 VMware Host Client(ブラウザ版)で設定を変更したら動作するようになりました。 なお、この設定変更は仮想マシンが停止した状態でないと実施できません。 また、KVMをインストールした後に変更してもKVMの再インストールは不要でした。
構成
想定環境

サーバ構成
OSバージョン
<ハイパーバイザ>
VMware ESXi 6.0.0
<ゲストOS>
CentOS 7.3.1611 x86_64
クライアント構成
OSバージョン
Windows 10 Pro 64bit
ソフトウェア・パッケージ一覧
- Microsoft Edge 38.14393.0.0
環境構築
ESXiの仮想マシン設定
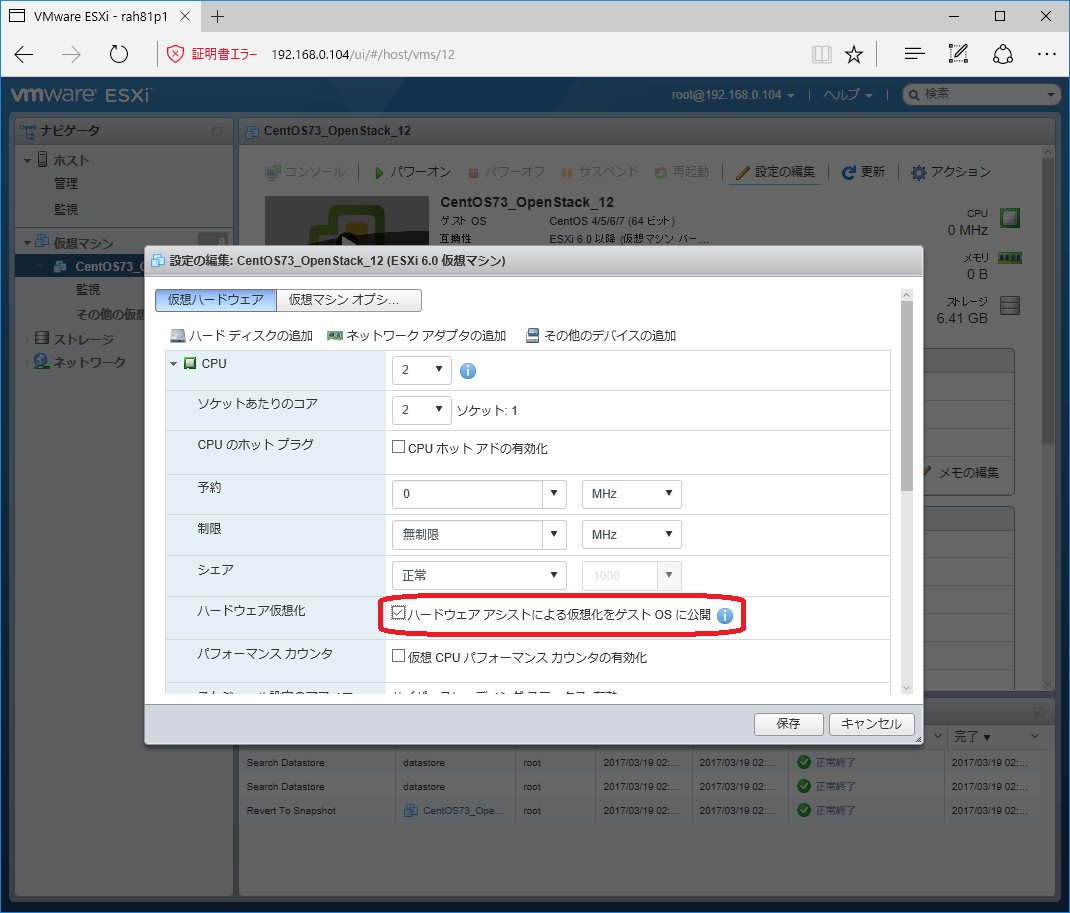
Webブラウザ(今回はEdgeを利用)で、ESXiホストのURL「https://IPアドレス/ui/」に接続してESXiホストにログインします。 ログイン後、KVMを動作させたい仮想マシンを選択して、[設定の編集]をクリックします。 以下の画面が表示されるので、[仮想ハードウェア]の[CPU]メニューを展開し、 [ハードウェア仮想化]の『ハードウェア アシストによる仮想化をゲストOSに公開』にチェックを付け、 [保存]ボタンをクリックします。設定は以上です。

ゲストOS(CentOS)での確認
CPUの仮想化支援機能が有効であることの確認
今回は仮想マシンのvCPU数が2だったため、プロセッサが2つ表示されています。 flagsの行に『vmx』と表示されていればIntel VTをサポートしたCPUということになります。 なお、CPUがAMDの場合は、AMD-Vをサポートしている場合『svm』と表示されます。
# cat /proc/cpuinfo
processor       : 0
vendor_id       : GenuineIntel
cpu family      : 6
model           : 60
model name      : Intel(R) Core(TM) i3-4130T CPU @ 2.90GHz
stepping        : 3
microcode       : 0x19
cpu MHz         : 2892.399
cache size      : 3072 KB
physical id     : 0
siblings        : 2
core id         : 0
cpu cores       : 2
apicid          : 0
initial apicid  : 0
fpu             : yes
fpu_exception   : yes
cpuid level     : 13
wp              : yes
flags           : fpu vme de pse tsc msr pae mce cx8 apic sep mtrr pge mca cmov pat pse36 clflush dts mmx fxsr sse sse2 ss ht syscall nx pdpe1gb rdtscp lm constant_tsc arch_perfmon pebs bts nopl xtopology tsc_reliable nonstop_tsc aperfmperf eagerfpu pni pclmulqdq vmx ssse3 fma cx16 pcid sse4_1 sse4_2 x2apic movbe popcnt tsc_deadline_timer aes xsave avx f16c rdrand hypervisor lahf_lm abm arat epb pln pts dtherm tpr_shadow vnmi ept vpid fsgsbase tsc_adjust bmi1 avx2 smep bmi2 invpcid xsaveopt
bogomips        : 5786.60
clflush size    : 64
cache_alignment : 64
address sizes   : 42 bits physical, 48 bits virtual
power management:

processor       : 1
vendor_id       : GenuineIntel
cpu family      : 6
model           : 60
model name      : Intel(R) Core(TM) i3-4130T CPU @ 2.90GHz
stepping        : 3
microcode       : 0x19
cpu MHz         : 2892.399
cache size      : 3072 KB
physical id     : 0
siblings        : 2
core id         : 1
cpu cores       : 2
apicid          : 1
initial apicid  : 1
fpu             : yes
fpu_exception   : yes
cpuid level     : 13
wp              : yes
flags           : fpu vme de pse tsc msr pae mce cx8 apic sep mtrr pge mca cmov pat pse36 clflush dts mmx fxsr sse sse2 ss ht syscall nx pdpe1gb rdtscp lm constant_tsc arch_perfmon pebs bts nopl xtopology tsc_reliable nonstop_tsc aperfmperf eagerfpu pni pclmulqdq vmx ssse3 fma cx16 pcid sse4_1 sse4_2 x2apic movbe popcnt tsc_deadline_timer aes xsave avx f16c rdrand hypervisor lahf_lm abm arat epb pln pts dtherm tpr_shadow vnmi ept vpid fsgsbase tsc_adjust bmi1 avx2 smep bmi2 invpcid xsaveopt
bogomips        : 5786.60
clflush size    : 64
cache_alignment : 64
address sizes   : 42 bits physical, 48 bits virtual
power management:

#
KVMの動作確認
KVMはLinuxカーネルの機能であるため、KVMが利用できる状態となっているかは、カーネルモジュールのリストを確認します。 以下のコマンドを実行し、kvm と kvm_intel(CPUがAMDの場合はkvm_amd)の2つが表示されればKVMが動作しています。
# lsmod | grep kvm
kvm_intel             170181  0 ←KVMのインテル用モジュール
kvm                   554609  1 kvm_intel ←KVMのモジュール
irqbypass              13503  1 kvm
