BitNami Redmine 2.4.2初期設定
目次
概要
BitNami Redmineのインストールに続き、初期設定を行います。 ここで書く手順は全て必須な訳ではありませんが、自動起動の設定や アクセスする際のURLの変更などやっておくと便利です。
構成
サーバ構成
OSバージョン
CentOS 6.4 x86_64
ソフトウェア・パッケージ一覧
bitnami-redmine-2.4.2-0-linux-x64-installer.run
クライアント構成
OSバージョン
Windows 7 Ultimate
ソフトウェア・パッケージ一覧
Internet Explorer 10
環境構築
設定
自動起動設定
BitNami Redmineをインストールした後は、パッケージと一緒にインストールされた シェルスクリプトを使用して起動・停止を行います。 このままでも特に問題ありませんが、作業を簡略化するために Linuxを起動・停止するタイミングでBitNami Redmineも一緒に 起動・停止されるようにrcへ登録します。
まずは起動・停止用のシェルスクリプトをrcのディレクトリにコピーします。
# cp -piv /opt/redmine-2.4.2-0/ctlscript.sh /etc/rc.d/init.d/bitnami-redmine
`/opt/redmine-2.4.2-0/ctlscript.sh' -> `/etc/rc.d/init.d/bitnami-redmine'
次にrcへ登録するために必須の記述をシェルスクリプト内に追記します。
# cd /etc/rc.d/init.d/
# vi bitnami-redmine
※以下、必要箇所を追記※
#!/bin/sh

# chkconfig: 2345 80 30     ←追記
# description: BitNami Service ←追記

# Allow only root execution
if [ `id|sed -e s/uid=//g -e s/\(.*//g` -ne 0 ]; then
    echo "This script requires root privileges"
    exit 1
fi
※以下変更がないので省略※
シェルスクリプトの準備ができたので、rcに登録します。 登録後は指定したランレベル2~5で起動する設定になっていることを確認します。
# chkconfig --add bitnami-redmine
# chkconfig --list bitnami-redmine
bitnami-redmine 0:off   1:off   2:on    3:on    4:on    5:on    6:off
アクセスURLの変更
BitNami Redmineインストール後は「http://アドレス/redmine/」でアクセスするように 設定されています。これを「http://アドレス/」でアクセスできるように変更します。 設定ファイルを2つ変更します。
# cd /opt/redmine-2.4.2-0/apps/redmine/conf/
# vi httpd-app.conf
<Directory "/opt/redmine-2.4.2-0/apps/redmine/htdocs/public">
    PassengerEnabled on
    Options -MultiViews
    AllowOverride All
    <IfVersion < 2.3 >
    Order allow,deny
    Allow from all
    </IfVersion>
    <IfVersion >= 2.3>
    Require all granted
    </IfVersion>
#    SetEnv RAILS_RELATIVE_URL_ROOT "/redmine"          ←コメントアウト
#    PassengerAppRoot "/opt/redmine-2.4.2-0/apps/redmine/htdocs" ←コメントアウト
</Directory>

PassengerPreStart http://127.0.0.1:80/redmine
# vi httpd-prefix.conf
#Alias /redmine/ "/opt/redmine-2.4.2-0/apps/redmine/htdocs/public/" ←コメントアウト
#Alias /redmine "/opt/redmine-2.4.2-0/apps/redmine/htdocs/public"  ←コメントアウト

DocumentRoot "/opt/redmine-2.4.2-0/apps/redmine/htdocs/public/" ←追加
Include "/opt/redmine-2.4.2-0/apps/redmine/conf/httpd-app.conf"
設定変更が終わったらBitNami Redmineを再起動して変更を反映します。
# service bitnami-redmine restart
/opt/redmine-2.4.2-0/subversion/scripts/ctl.sh : subversion stopped
Syntax OK
/opt/redmine-2.4.2-0/apache2/scripts/ctl.sh : httpd stopped
/opt/redmine-2.4.2-0/mysql/scripts/ctl.sh : mysql stopped
140124 20:05:40 mysqld_safe Logging to '/opt/redmine-2.4.2-0/mysql/data/mysqld.log'.
140124 20:05:40 mysqld_safe Starting mysqld.bin daemon with databases from /opt/redmine-2.4.2-0/mysql/data
/opt/redmine-2.4.2-0/mysql/scripts/ctl.sh : mysql  started at port 3306
Syntax OK
/opt/redmine-2.4.2-0/apache2/scripts/ctl.sh : httpd started at port 80
/opt/redmine-2.4.2-0/subversion/scripts/ctl.sh : subversion started at port 3690
動作テスト
初期設定が完了したらブラウザからアクセスします。 ブラウザのURLに「http://192.168.0.78/」のように、 RedmineをインストールしたサーバのIPアドレスを入力して接続します。
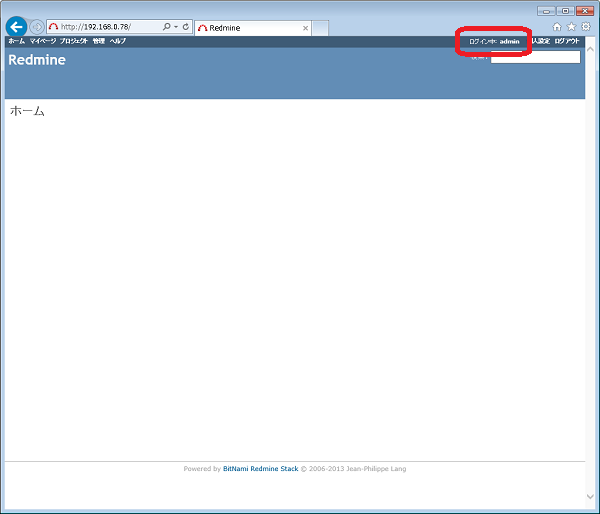
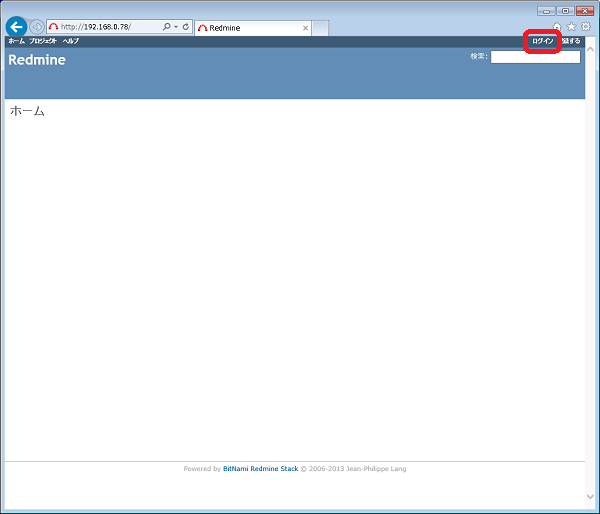
インストール直後は「http://192.168.0.78/」のようにルートディレクトリ に対してアクセスすると、BitNamiのWelcomeページが表示されていましたが、 初期設定後は以下のようにRedmineのホーム画面が表示されるようになります。
ホーム画面右上の[ログイン]をクリックします。
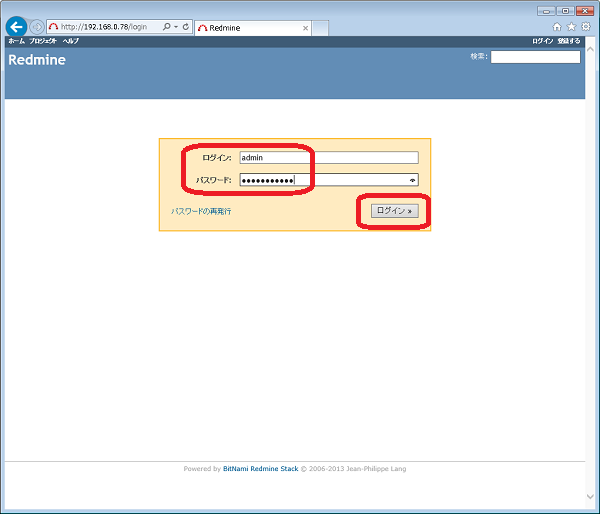
ログイン画面が表示されたら、インストールの時に指定した[ログイン(ID)]と[パスワード]を入力し、 [ログイン]ボタンをクリックします。。
ログインに成功するとホーム画面が表示され、画面右上に「ログイン中: admin」のように ログイン中のユーザが表示されます。