
ntpインストール+NTPサーバ・クライアント設定
目次
構成
想定環境
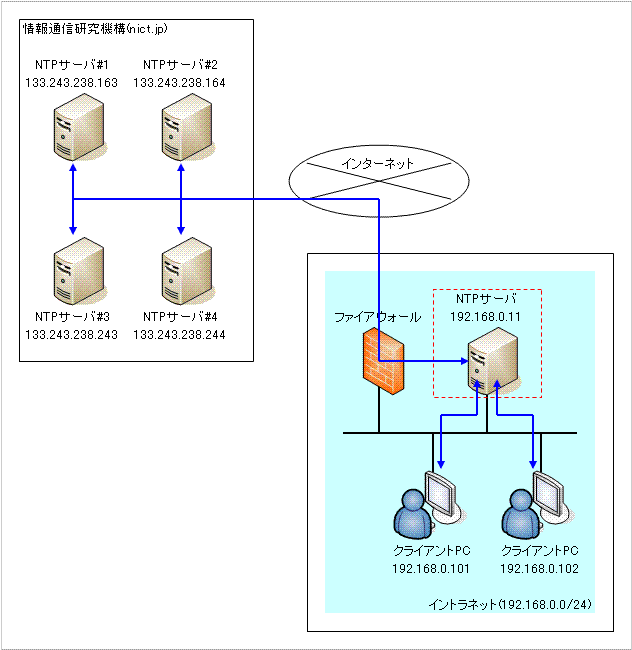
サーバ構成
OSバージョン
CentOS release 5 (Final) 32bit
パッケージ一覧
ntp-4.2.2p1-5.el5.i386.rpm
クライアント構成
OSバージョン
Windows XP Professional Service Pack 3
環境構築
インストール
NTPサーバに必要なパッケージを1つインストールします。
DVDドライブにCentOS 5のDVD-ROMをセットし、以下のコマンドを実行します。
# cd /media/cdrom/CentOS/
# rpm -ihv ntp-4.2.2p1-5.el5.i386.rpm
Preparing... ########################################### [100%]
1:ntp ########################################### [100%]
# cd /
# umount /media/cdrom
設定
NTPサーバの設定
viエディタでNTPサーバの設定ファイル(ntp.conf)を開きます。
# vi ntp.conf
# Permit time synchronization with our time source, but do not
# permit the source to query or modify the service on this system.
#restrict default kod nomodify notrap nopeer noquery ←コメントアウト
#restrict -6 default kod nomodify notrap nopeer noquery ←コメントアウト
restrict default ignore ←追加
# Permit all access over the loopback interface. This could
# be tightened as well, but to do so would effect some of
# the administrative functions.
restrict 127.0.0.1
#restrict -6 ::1 ←コメントアウト
# Hosts on local network are less restricted.
#restrict 192.168.1.0 mask 255.255.255.0 nomodify notrap
restrict 192.168.0.0 mask 255.255.255.0 nomodify notrap ←追加
restrict 133.243.238.163 mask 255.255.255.255 nomodify notrap noquery ←追加
restrict 133.243.238.164 mask 255.255.255.255 nomodify notrap noquery ←追加
restrict 133.243.238.243 mask 255.255.255.255 nomodify notrap noquery ←追加
restrict 133.243.238.244 mask 255.255.255.255 nomodify notrap noquery ←追加
# Use public servers from the pool.ntp.org project.
# Please consider joining the pool (http://www.pool.ntp.org/join.html).
#server 0.rhel.pool.ntp.org ←コメントアウト
#server 1.rhel.pool.ntp.org ←コメントアウト
#server 2.rhel.pool.ntp.org ←コメントアウト
server -4 ntp.nict.jp iburst ←追加
server -4 ntp.nict.jp iburst ←追加
server -4 ntp.nict.jp iburst ←追加
※以下、変更がないため省略※
NTPサーバの起動ランレベル変更
OSの起動に合わせてデーモンを自動起動する設定に変更します。
以上で設定が終了しましたのでrcスクリプトを使用してデーモンを起動します。
Starting ntpd: [ OK ]
設定ファイル
/etc/ntp.conf
クライアント設定
設定
Windowsのデスクトップ画面左下の [スタート] メニューから [コントロール パネル] を選択します。
「コントロール パネル」 ウィンドウが表示されたら、 [日付、時刻、地域と言語のオプション] を選択します。
「日付、時刻、地域と言語のオプション」 ウィンドウが表示されたら、 [日付と時刻] を選択します。
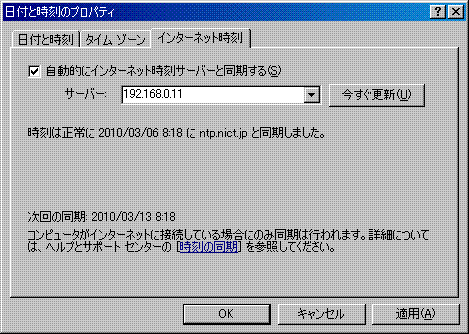
「日付と時刻のプロパティ」 ウィンドウが表示されたら、 [インターネット時刻] タブを選択します。
[インターネット時刻] タブに切り替わったら、
[サーバー] に 192.168.0.11 を入力し、 [OK] ボタンをクリックします。
「日付、時刻、地域と言語のオプション」 ウィンドウを閉じます。
【補足】
「日付と時刻のプロパティ」 ウィンドウを表示するには
Windowsのデスクトップ画面右下にある時計をダブルクリックする方法もあります。
動作テスト
「日付と時刻のプロパティ」 ウィンドウで [インターネット時刻] タブを開き、 [今すぐ更新] ボタンをクリックします。
ウィンドウの中央辺りに以下のように表示されれば成功です。
『192.168.0.11 と同期しています。お待ち下さい。』
↓
『時刻は正常に 2010/03/06 8:18 に 192.168.0.11 と同期しました。』
利用方法
上記設定ができており、動作テストに成功していれば、 その他利用に際して必要となる操作はありません。
WindowsXPの場合は時刻同期の間隔が7日となっています。 目に見えて時刻がずれている場合は動作テストと同じ方法で時刻同期を実行して下さい。