Postfixインストール+初期設定
最終更新日:2020/12/07 | 公開日:2010/03/03
目次
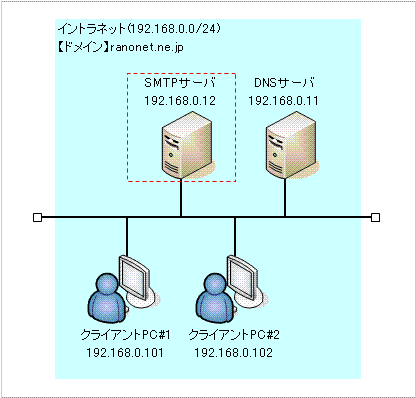
構成
想定環境

サーバ構成
OSバージョン
CentOS release 5 (Final) 32bit
パッケージ一覧
postfix-2.3.3-2.i386.rpm
クライアント構成
OSバージョン
Windows XP Professional Service Pack 3
ソフトウェア一覧
Outlook Express 6
環境構築
インストール
初期状態ではsendmailというSMTPサーバが稼働しています。
まずはこのsendmailを停止し、自動起動の設定を解除します。
次にSMTPサーバに必要なパッケージを1つインストールします。
DVDドライブにCentOS 5のDVD-ROMをセットし、以下のコマンドを実行します。
# /etc/rc.d/init.d/sendmail stop
Shutting down sm-client:                                   [  OK  ]
Shutting down sendmail:                                    [  OK  ]
# chkconfig sendmail off
# mount /dev/cdrom /media/cdrom
# cd /media/cdrom/CentOS/
# rpm -ihv postfix-2.3.3-2.i386.rpm
Preparing...                ########################################### [100%]
   1:postfix                ########################################### [100%]
# cd /
# umount /media/cdrom
設定
イントラネットでメールを送信するための設定を行います。 基本的にはイントラネット内でのメール交換だけを目的としていますが、 普通にイントラ外のインターネットへもメールを送信することができます。 ただし、外部からのメールは受け取れません。
MTAの選択
Postfixをインストールした後はSMTPサーバとして SendmailとPostfixの2つが利用できる状態となっています。 このうちPostfixを利用するための設定を行います。
# alternatives --config mta

There are 2 programs which provide 'mta'.

  Selection    Command
========================================-------
*+ 1           /usr/sbin/sendmail.sendmail
   2           /usr/sbin/sendmail.postfix

Enter to keep the current selection[+], or type selection number:2 ←2を入力
SMTPサーバの設定
viエディタで設定ファイル(main.cf)を開き、設定を変更します。
# cd /etc/postfix/
# vi main.cf
ファイル名:/etc/postfix/main.cf
※該当箇所のみ変更※
#myhostname = host.domain.tld
#myhostname = virtual.domain.tlc
   ↓変更
myhostname = mail.ranonet.ne.jp ←#を外して設定を変更
#myhostname = virtual.domain.tlc
#mydomain = domain.tld
   ↓変更
mydomain = ranonet.ne.jp ←#を外して設定を変更
#myorigin = $myhostname
#myorigin = $mydomain
   ↓変更
#myorigin = $myhostname
myorigin = $mydomain ←#を外す
#inet_interfaces = all
#inet_interfaces = $myhostname
#inet_interfaces = $myhostname, localhost
inet_interfaces = localhost
   ↓変更
inet_interfaces = all ←#を外す
#inet_interfaces = $myhostname
#inet_interfaces = $myhostname, localhost
#inet_interfaces = localhost ←#を付ける
mydestination = $myhostname, localhost.$mydomain, localhost
#mydestination = $myhostname, localhost.$mydomain, localhost, $mydomain
#mydestination = $myhostname, localhost.$mydomain, localhost, $mydomain,
#       mail.$mydomain, www.$mydomain, ftp.$mydomain
   ↓変更
#mydestination = $myhostname, localhost.$mydomain, localhost ←#を付ける
mydestination = $myhostname, localhost.$mydomain, localhost, $mydomain ←#を外す
#mydestination = $myhostname, localhost.$mydomain, localhost, $mydomain,
#       mail.$mydomain, www.$mydomain, ftp.$mydomain
#mynetworks = 168.100.189.0/24, 127.0.0.0/8
#mynetworks = $config_directory/mynetworks
#mynetworks = hash:/etc/postfix/network_table
   ↓変更
mynetworks = 192.168.0.0/24, 127.0.0.0/8 ←#を外して設定を変更
#mynetworks = $config_directory/mynetworks
#mynetworks = hash:/etc/postfix/network_table
SMTPサーバの起動ランレベル変更
Postfixはインストールした状態でOSの起動に合わせてデーモンを
自動起動する設定になっているため設定の変更は不要です。
以上で設定が終了しましたのでrcスクリプトを使用してデーモンを起動します。
# /etc/rc.d/init.d/postfix start
Starting postfix:                                          [  OK  ]
設定ファイル
/etc/postfix/main.cf
