openDCIM 4.2をさくらのVPS(CentOS 6.7)へインストール
目次
概要
オープンソースのデータセンタ管理ツールであるopenDCIMをセットアップします。 どんなことが管理できるツールなのかあまり分かっていませんが、ツールのタイトルに興味が沸いたのでまずはソフトウェアをインストールしてみます。 今回は利用方法については触れません(別途まとめる予定)。 また、インストールするApacheやMySQLのミドルウェアについて、最低限動作する設定のみ行います。 本格利用する際にはもっとセキュリティ設定等が必要になりますのでその点は注意してください。 サーバにはさくらインターネットが提供する「さくらのVPS」を利用しました。 OSは標準OSのCentOS 6.7を利用しています。カスタムOSとして再インストールしていません。
構成
想定環境
openDCIMをインストールするサーバ環境としてさくらインターネットが提供する「さくらのVPS」を利用しました。 サーバのスペックは以下のとおりです。
| 項目 | 内容 |
|---|---|
| CPU | 仮想2コア |
| メモリ | 1GB |
| ディスク | SSD 30GB |
| リージョン | 東京 |
| 価格 | 月額972円(税込) |
サーバ構成
OSバージョン
CentOS 6.7 x86_64
ソフトウェア・パッケージ一覧
2016年5月22日時点での最新版「openDCIM 4.2」を以下のopendcimのサイトからダウンロードして使用しました。
【関連サイト】
Released Versions of openDCIM
- openDCIM-4.2.tar.gz
クライアント構成
OSバージョン
Windows 7 Ultimate Service Pack 1 64bit
ソフトウェア・パッケージ一覧
- Internet Explorer 11
環境構築
インストール
ミドルウェアのインストール
openDCIMの実体はPHPで書かれたアプリケーションです。 このアプリケーションを動作させるためのミドルウェアとしてAhache HTTP Server、MySQL、PHPの実行環境を準備します。 いずれもCentOS 6.7の標準パッケージとして配布されていますので、yumでまとめてインストールします。
# yum install httpd mysql-server php php-mysql php-mbstring php-snmp
Loaded plugins: fastestmirror, security
Setting up Install Process
Loading mirror speeds from cached hostfile
epel/metalink | 5.2 kB 00:00
* base: ftp.iij.ad.jp
* epel: ftp.kddilabs.jp
* extras: ftp.iij.ad.jp
* updates: ftp.iij.ad.jp
base | 3.7 kB 00:00
extras | 3.4 kB 00:00
updates | 3.4 kB 00:00
Resolving Dependencies
--> Running transaction check
---> Package httpd.x86_64 0:2.2.15-47.el6.centos.4 will be installed
--> Processing Dependency: httpd-tools = 2.2.15-47.el6.centos.4 for package: httpd-2.2.15-47.el6.centos.4.x86_64
--> Processing Dependency: apr-util-ldap for package: httpd-2.2.15-47.el6.centos.4.x86_64
---> Package mysql-server.x86_64 0:5.1.73-5.el6_7.1 will be installed
--> Processing Dependency: mysql = 5.1.73-5.el6_7.1 for package: mysql-server-5.1.73-5.el6_7.1.x86_64
--> Processing Dependency: perl-DBI for package: mysql-server-5.1.73-5.el6_7.1.x86_64
--> Processing Dependency: perl-DBD-MySQL for package: mysql-server-5.1.73-5.el6_7.1.x86_64
--> Processing Dependency: perl(DBI) for package: mysql-server-5.1.73-5.el6_7.1.x86_64
---> Package php.x86_64 0:5.3.3-46.el6_7.1 will be installed
--> Processing Dependency: php-common(x86-64) = 5.3.3-46.el6_7.1 for package: php-5.3.3-46.el6_7.1.x86_64
--> Processing Dependency: php-cli(x86-64) = 5.3.3-46.el6_7.1 for package: php-5.3.3-46.el6_7.1.x86_64
---> Package php-mbstring.x86_64 0:5.3.3-46.el6_7.1 will be installed
---> Package php-mysql.x86_64 0:5.3.3-46.el6_7.1 will be installed
--> Processing Dependency: php-pdo(x86-64) for package: php-mysql-5.3.3-46.el6_7.1.x86_64
---> Package php-snmp.x86_64 0:5.3.3-46.el6_7.1 will be installed
--> Processing Dependency: net-snmp for package: php-snmp-5.3.3-46.el6_7.1.x86_64
--> Processing Dependency: libnetsnmp.so.20()(64bit) for package: php-snmp-5.3.3-46.el6_7.1.x86_64
--> Running transaction check
---> Package apr-util-ldap.x86_64 0:1.3.9-3.el6_0.1 will be installed
---> Package httpd-tools.x86_64 0:2.2.15-47.el6.centos.4 will be installed
---> Package mysql.x86_64 0:5.1.73-5.el6_7.1 will be installed
---> Package net-snmp.x86_64 1:5.5-54.el6_7.1 will be installed
--> Processing Dependency: libsensors.so.4()(64bit) for package: 1:net-snmp-5.5-54.el6_7.1.x86_64
---> Package net-snmp-libs.x86_64 1:5.5-54.el6_7.1 will be installed
---> Package perl-DBD-MySQL.x86_64 0:4.013-3.el6 will be installed
---> Package perl-DBI.x86_64 0:1.609-4.el6 will be installed
---> Package php-cli.x86_64 0:5.3.3-46.el6_7.1 will be installed
---> Package php-common.x86_64 0:5.3.3-46.el6_7.1 will be installed
---> Package php-pdo.x86_64 0:5.3.3-46.el6_7.1 will be installed
--> Running transaction check
---> Package lm_sensors-libs.x86_64 0:3.1.1-17.el6 will be installed
--> Finished Dependency Resolution
Dependencies Resolved
============================================================================================================================================
Package Arch Version Repository Size
============================================================================================================================================
Installing:
httpd x86_64 2.2.15-47.el6.centos.4 updates 831 k
mysql-server x86_64 5.1.73-5.el6_7.1 updates 8.6 M
php x86_64 5.3.3-46.el6_7.1 updates 1.1 M
php-mbstring x86_64 5.3.3-46.el6_7.1 updates 460 k
php-mysql x86_64 5.3.3-46.el6_7.1 updates 86 k
php-snmp x86_64 5.3.3-46.el6_7.1 updates 35 k
Installing for dependencies:
apr-util-ldap x86_64 1.3.9-3.el6_0.1 base 15 k
httpd-tools x86_64 2.2.15-47.el6.centos.4 updates 77 k
lm_sensors-libs x86_64 3.1.1-17.el6 base 38 k
mysql x86_64 5.1.73-5.el6_7.1 updates 894 k
net-snmp x86_64 1:5.5-54.el6_7.1 updates 308 k
net-snmp-libs x86_64 1:5.5-54.el6_7.1 updates 1.5 M
perl-DBD-MySQL x86_64 4.013-3.el6 base 134 k
perl-DBI x86_64 1.609-4.el6 base 705 k
php-cli x86_64 5.3.3-46.el6_7.1 updates 2.2 M
php-common x86_64 5.3.3-46.el6_7.1 updates 529 k
php-pdo x86_64 5.3.3-46.el6_7.1 updates 80 k
Transaction Summary
============================================================================================================================================
Install 17 Package(s)
Total download size: 18 M
Installed size: 54 M
Is this ok [y/N]: y ←インストールされるパッケージを確認し、「y」を入力する
Downloading Packages:
(1/17): apr-util-ldap-1.3.9-3.el6_0.1.x86_64.rpm | 15 kB 00:00
(2/17): httpd-2.2.15-47.el6.centos.4.x86_64.rpm | 831 kB 00:00
(3/17): httpd-tools-2.2.15-47.el6.centos.4.x86_64.rpm | 77 kB 00:00
(4/17): lm_sensors-libs-3.1.1-17.el6.x86_64.rpm | 38 kB 00:00
(5/17): mysql-5.1.73-5.el6_7.1.x86_64.rpm | 894 kB 00:00
(6/17): mysql-server-5.1.73-5.el6_7.1.x86_64.rpm | 8.6 MB 00:01
(7/17): net-snmp-5.5-54.el6_7.1.x86_64.rpm | 308 kB 00:00
(8/17): net-snmp-libs-5.5-54.el6_7.1.x86_64.rpm | 1.5 MB 00:00
(9/17): perl-DBD-MySQL-4.013-3.el6.x86_64.rpm | 134 kB 00:00
(10/17): perl-DBI-1.609-4.el6.x86_64.rpm | 705 kB 00:00
(11/17): php-5.3.3-46.el6_7.1.x86_64.rpm | 1.1 MB 00:00
(12/17): php-cli-5.3.3-46.el6_7.1.x86_64.rpm | 2.2 MB 00:00
(13/17): php-common-5.3.3-46.el6_7.1.x86_64.rpm | 529 kB 00:00
(14/17): php-mbstring-5.3.3-46.el6_7.1.x86_64.rpm | 460 kB 00:00
(15/17): php-mysql-5.3.3-46.el6_7.1.x86_64.rpm | 86 kB 00:00
(16/17): php-pdo-5.3.3-46.el6_7.1.x86_64.rpm | 80 kB 00:00
(17/17): php-snmp-5.3.3-46.el6_7.1.x86_64.rpm | 35 kB 00:00
--------------------------------------------------------------------------------------------------------------------------------------------
Total 8.0 MB/s | 18 MB 00:02
Running rpm_check_debug
Running Transaction Test
Transaction Test Succeeded
Running Transaction
Installing : php-common-5.3.3-46.el6_7.1.x86_64 1/17
Installing : perl-DBI-1.609-4.el6.x86_64 2/17
Installing : lm_sensors-libs-3.1.1-17.el6.x86_64 3/17
Installing : 1:net-snmp-libs-5.5-54.el6_7.1.x86_64 4/17
Installing : 1:net-snmp-5.5-54.el6_7.1.x86_64 5/17
Installing : perl-DBD-MySQL-4.013-3.el6.x86_64 6/17
Installing : php-cli-5.3.3-46.el6_7.1.x86_64 7/17
Installing : php-pdo-5.3.3-46.el6_7.1.x86_64 8/17
Installing : httpd-tools-2.2.15-47.el6.centos.4.x86_64 9/17
Installing : mysql-5.1.73-5.el6_7.1.x86_64 10/17
Installing : apr-util-ldap-1.3.9-3.el6_0.1.x86_64 11/17
Installing : httpd-2.2.15-47.el6.centos.4.x86_64 12/17
Installing : php-5.3.3-46.el6_7.1.x86_64 13/17
Installing : mysql-server-5.1.73-5.el6_7.1.x86_64 14/17
Installing : php-mysql-5.3.3-46.el6_7.1.x86_64 15/17
Installing : php-snmp-5.3.3-46.el6_7.1.x86_64 16/17
Installing : php-mbstring-5.3.3-46.el6_7.1.x86_64 17/17
Verifying : php-common-5.3.3-46.el6_7.1.x86_64 1/17
Verifying : php-cli-5.3.3-46.el6_7.1.x86_64 2/17
Verifying : php-mysql-5.3.3-46.el6_7.1.x86_64 3/17
Verifying : perl-DBD-MySQL-4.013-3.el6.x86_64 4/17
Verifying : lm_sensors-libs-3.1.1-17.el6.x86_64 5/17
Verifying : 1:net-snmp-libs-5.5-54.el6_7.1.x86_64 6/17
Verifying : apr-util-ldap-1.3.9-3.el6_0.1.x86_64 7/17
Verifying : mysql-5.1.73-5.el6_7.1.x86_64 8/17
Verifying : perl-DBI-1.609-4.el6.x86_64 9/17
Verifying : php-pdo-5.3.3-46.el6_7.1.x86_64 10/17
Verifying : php-5.3.3-46.el6_7.1.x86_64 11/17
Verifying : php-snmp-5.3.3-46.el6_7.1.x86_64 12/17
Verifying : httpd-2.2.15-47.el6.centos.4.x86_64 13/17
Verifying : 1:net-snmp-5.5-54.el6_7.1.x86_64 14/17
Verifying : httpd-tools-2.2.15-47.el6.centos.4.x86_64 15/17
Verifying : php-mbstring-5.3.3-46.el6_7.1.x86_64 16/17
Verifying : mysql-server-5.1.73-5.el6_7.1.x86_64 17/17
Installed:
httpd.x86_64 0:2.2.15-47.el6.centos.4 mysql-server.x86_64 0:5.1.73-5.el6_7.1 php.x86_64 0:5.3.3-46.el6_7.1
php-mbstring.x86_64 0:5.3.3-46.el6_7.1 php-mysql.x86_64 0:5.3.3-46.el6_7.1 php-snmp.x86_64 0:5.3.3-46.el6_7.1
Dependency Installed:
apr-util-ldap.x86_64 0:1.3.9-3.el6_0.1 httpd-tools.x86_64 0:2.2.15-47.el6.centos.4 lm_sensors-libs.x86_64 0:3.1.1-17.el6
mysql.x86_64 0:5.1.73-5.el6_7.1 net-snmp.x86_64 1:5.5-54.el6_7.1 net-snmp-libs.x86_64 1:5.5-54.el6_7.1
perl-DBD-MySQL.x86_64 0:4.013-3.el6 perl-DBI.x86_64 0:1.609-4.el6 php-cli.x86_64 0:5.3.3-46.el6_7.1
php-common.x86_64 0:5.3.3-46.el6_7.1 php-pdo.x86_64 0:5.3.3-46.el6_7.1
Complete!
openDCIMのインストール
openDCIMのサイトから直接wgetコマンドでopenDCIMのアーカイブファイルをダウンロードします。 ダウンロードしたアーカイブファイルはApacheのドキュメントルートである /var/www/html/ ディレクトリ配下に展開します。 openDCIMを利用する際には、ブラウザから「http://アドレス/dcim/」でアクセスする前提とするため、 展開して生成された「openDCIM-4.2-Release」ディレクトリを「dcim」にリネームします。
# cd /media/
# mkdir -p file/openDCIM-4.2
# cd file/openDCIM-4.2/
# wget http://opendcim.org/packages/openDCIM-4.2.tar.gz
--2016-05-22 19:19:24--  http://opendcim.org/packages/openDCIM-4.2.tar.gz
Resolving opendcim.org... 162.243.19.165
Connecting to opendcim.org|162.243.19.165|:80... connected.
HTTP request sent, awaiting response... 200 OK
Length: 8669250 (8.3M) [application/x-gzip]
Saving to: `openDCIM-4.2.tar.gz'

100%[==================================================================================================>] 8,669,250   2.09M/s   in 4.9s

2016-05-22 19:19:29 (1.69 MB/s) - `openDCIM-4.2.tar.gz' saved [8669250/8669250]

# ls -l
total 8468
-rw-r--r-- 1 root root 8669250 Apr  1 02:15 openDCIM-4.2.tar.gz
# tar zxvf openDCIM-4.2.tar.gz -C /var/www/html/
openDCIM-4.2-Release/
openDCIM-4.2-Release/.gitignore
openDCIM-4.2-Release/CHANGELOG
openDCIM-4.2-Release/INSTALL
openDCIM-4.2-Release/OSS_SNMP/
(中略)
openDCIM-4.2-Release/vmnamecheck.php
openDCIM-4.2-Release/vmware.inc.php
openDCIM-4.2-Release/workorder.php
openDCIM-4.2-Release/zone.php
openDCIM-4.2-Release/zone_stats.php
# cd /var/www/html/
# ls -l
total 4
drwxrwxr-x 16 root root 4096 Apr  1 01:58 openDCIM-4.2-Release
# mv openDCIM-4.2-Release dcim
ここまでで一通り必要なミドルウェアとアプリケーションがインストールされたので、 続いてopenDCIMが動作するよう各ミドルウェアを設定します。
設定
MySQLの起動
MySQLのサービスを起動します。
# service mysqld start
Initializing MySQL database:  Installing MySQL system tables...
OK
Filling help tables...
OK

To start mysqld at boot time you have to copy
support-files/mysql.server to the right place for your system

PLEASE REMEMBER TO SET A PASSWORD FOR THE MySQL root USER !
To do so, start the server, then issue the following commands:

/usr/bin/mysqladmin -u root password 'new-password'
/usr/bin/mysqladmin -u root -h tk2-xxx-xxxxx.xx.sakura.ne.jp password 'new-password'

Alternatively you can run:
/usr/bin/mysql_secure_installation

which will also give you the option of removing the test
databases and anonymous user created by default.  This is
strongly recommended for production servers.

See the manual for more instructions.

You can start the MySQL daemon with:
cd /usr ; /usr/bin/mysqld_safe &

You can test the MySQL daemon with mysql-test-run.pl
cd /usr/mysql-test ; perl mysql-test-run.pl

Please report any problems with the /usr/bin/mysqlbug script!

                                                           [  OK  ]
Starting mysqld:                                           [  OK  ]
# service mysqld status
mysqld (pid  24249) is running...
MySQLの自動起動設定
Linuxの起動・停止と共にMySQLのサービスが自動起動・停止するように設定します。
# chkconfig --list mysqld
mysqld          0:off   1:off   2:off   3:off   4:off   5:off   6:off
# chkconfig mysqld on
# chkconfig --list mysqld
mysqld          0:off   1:off   2:on    3:on    4:on    5:on    6:off
MySQLの初期設定
MySQLから標準で提供されている初期設定ツールを利用して、rootユーザのパスワード設定など初期設定を行います。
# mysql_secure_installation


NOTE: RUNNING ALL PARTS OF THIS SCRIPT IS RECOMMENDED FOR ALL MySQL
      SERVERS IN PRODUCTION USE!  PLEASE READ EACH STEP CAREFULLY!


In order to log into MySQL to secure it, we'll need the current
password for the root user.  If you've just installed MySQL, and
you haven't set the root password yet, the password will be blank,
so you should just press enter here.

Enter current password for root (enter for none): ←何も入力せずに[Enter]キーを押す
OK, successfully used password, moving on...

Setting the root password ensures that nobody can log into the MySQL
root user without the proper authorisation.

Set root password? [Y/n] Y
New password: ←MySQLのrootユーザのパスワードを入力(設定)する
Re-enter new password: ←上と同じパスワードを再入力する
Password updated successfully!
Reloading privilege tables..
 ... Success!


By default, a MySQL installation has an anonymous user, allowing anyone
to log into MySQL without having to have a user account created for
them.  This is intended only for testing, and to make the installation
go a bit smoother.  You should remove them before moving into a
production environment.

Remove anonymous users? [Y/n] Y
 ... Success!

Normally, root should only be allowed to connect from 'localhost'.  This
ensures that someone cannot guess at the root password from the network.

Disallow root login remotely? [Y/n] Y
 ... Success!

By default, MySQL comes with a database named 'test' that anyone can
access.  This is also intended only for testing, and should be removed
before moving into a production environment.

Remove test database and access to it? [Y/n] Y
 - Dropping test database...
 ... Success!
 - Removing privileges on test database...
 ... Success!

Reloading the privilege tables will ensure that all changes made so far
will take effect immediately.

Reload privilege tables now? [Y/n] Y
 ... Success!

Cleaning up...


All done!  If you've completed all of the above steps, your MySQL
installation should now be secure.

Thanks for using MySQL!


#
データベースの作成とユーザの作成、操作権限付与
openDCIMのデータを格納するデータベースを作成します。 また、このデータベースを操作するための専用のユーザを作成し、操作権限を付与します。
# mysql -u root -p
Enter password: ←rootユーザのパスワードを入力する
Welcome to the MySQL monitor.  Commands end with ; or \g.
Your MySQL connection id is 10
Server version: 5.1.73 Source distribution

Copyright (c) 2000, 2013, Oracle and/or its affiliates. All rights reserved.

Oracle is a registered trademark of Oracle Corporation and/or its
affiliates. Other names may be trademarks of their respective
owners.

Type 'help;' or '\h' for help. Type '\c' to clear the current input statement.

mysql> create database dcim; ←データベースの作成
Query OK, 1 row affected (0.00 sec)

mysql> grant all privileges on dcim.* to 'dcim' identified by 'DcimPass'; ←作成したデータベースを操作するためのユーザを作成し、権限を付与する
Query OK, 0 rows affected (0.00 sec)

mysql> exit
Bye
openDCIMのDB接続設定
openDCIMのDB接続用設定ファイルを作成します。 標準で設定のテンプレートファイルが提供されていますので、コピーして利用します。 コピー後にファイルを修正するのはMySQL接続用のパスワードのみで良いです。 MySQLで dcim ユーザ作成時に設定したパスワードを設定ファイルに記述します。
# cd /var/www/html/dcim/
# cp -piv db.inc.php-dist db.inc.php
`db.inc.php-dist' -> `db.inc.php'
# vi db.inc.php
※以下、該当箇所のみ変更※
        $dbpass = 'dcim';
   ↓変更
        $dbpass = 'DcimPass'; ←MySQLのdcimユーザのパスワードを記述
Apacheの初期設定
Apache HTTP Serverの初期設定として、openDCIMの動作要件となっている設定を行います。 主にはBASIC認証の設定となります。Apacheの設定でopenDCIMの動作要件を満たしていない場合は、 接続時にチェックでエラーとなってしまいますので、必ず設定します。 BASIC認証用のユーザは admin という名のユーザとし、パスワードを設定します。
# cd /etc/httpd/conf/
# htpasswd -c .htpasswd admin ←BASIC認証用のユーザ admin を作成
New password: ←ユーザ admin のパスワードを入力(設定)
Re-type new password: ←ユーザ admin のパスワードを再入力
Adding password for user admin
# ls -al
total 64
drwxr-xr-x 2 root root  4096 May 22 19:36 .
drwxr-xr-x 4 root root  4096 May 22 19:02 ..
-rw-r--r-- 1 root root    20 May 22 19:37 .htpasswd ←ファイルが作成された
-rw-r--r-- 1 root root 34419 Feb  4 22:18 httpd.conf
-rw-r--r-- 1 root root 13139 Mar 23 04:04 magic
# vi httpd.conf
※以下、該当箇所のみ変更※
<Directory "/var/www/html">

    Options Indexes FollowSymLinks
   ↓変更
    Options FollowSymLinks ←ディレクトリ内のファイルが一覧表示されることを防止(必須ではない)
※以下、該当箇所のみ変更※
    AllowOverride None
   ↓変更
    AllowOverride All ←openDCIMの動作要件として指定されている設定
    Order allow,deny
    Allow from all

    AuthType Basic ←追加
    AuthName "openDCIM" ←追加
    AuthUserFile /etc/httpd/conf/.htpasswd ←追加
    Require valid-user ←追加

</Directory>
Apacheの自動起動設定
Linuxの起動・停止と共にApacheのサービスが自動起動・停止するように設定します。
# chkconfig --list httpd
httpd           0:off   1:off   2:off   3:off   4:off   5:off   6:off ←自動起動する設定になっていない
# chkconfig httpd on
# chkconfig --list httpd
httpd           0:off   1:off   2:on    3:on    4:on    5:on    6:off ←自動起動する設定になった
Apacheの起動
Apacheの設定が終わったので、Apacheのサービスを起動します。
# service httpd status
httpd is stopped ←Apacheは停止している
# service httpd start
Starting httpd:                                            [  OK  ]
# service httpd status
httpd (pid  24517) is running... ←Apacheが起動した
以上で最低限必要な設定は一通り完了です。
動作テスト
サービスのステータス確認
設定手順の中でも確認しましたが、openDCIMを利用するためのミドルウェアとしてApacheとMySQLを設定しましたので、 ApacheとMySQLのサービスのステータスが稼働中であることを確認します。
# service httpd status
httpd (pid  24587) is running...
# service mysqld status
mysqld (pid  24249) is running...
プロセスの起動確認
上記と同様に、ApacheとMySQLのプロセスが起動していることを確認します。
# ps -ef | grep httpd
root     24587     1  0 May22 ?        00:00:00 /usr/sbin/httpd
apache   24589 24587  0 May22 ?        00:00:00 /usr/sbin/httpd
apache   24590 24587  0 May22 ?        00:00:00 /usr/sbin/httpd
apache   24591 24587  0 May22 ?        00:00:00 /usr/sbin/httpd
apache   24592 24587  0 May22 ?        00:00:00 /usr/sbin/httpd
apache   24593 24587  0 May22 ?        00:00:00 /usr/sbin/httpd
apache   24594 24587  0 May22 ?        00:00:00 /usr/sbin/httpd
apache   24595 24587  0 May22 ?        00:00:00 /usr/sbin/httpd
apache   24596 24587  0 May22 ?        00:00:00 /usr/sbin/httpd
root     24933 24917  0 01:25 pts/0    00:00:00 grep httpd
# ps -ef | grep mysqld
root     24147     1  0 May22 ?        00:00:00 /bin/sh /usr/bin/mysqld_safe --datadir=/var/lib/mysql --socket=/var/lib/mysql/mysql.sock --pid-file=/var/run/mysqld/mysqld.pid --basedir=/usr --user=mysql
mysql    24249 24147  0 May22 ?        00:00:07 /usr/libexec/mysqld --basedir=/usr --datadir=/var/lib/mysql --user=mysql --log-error=/var/log/mysqld.log --pid-file=/var/run/mysqld/mysqld.pid --socket=/var/lib/mysql/mysql.sock
root     24935 24917  0 01:25 pts/0    00:00:00 grep mysqld
プロセスのリスニングポート確認
ApacheとMySQLがリスニングしているポートを確認します。
# netstat -tanp
Active Internet connections (servers and established)
Proto Recv-Q Send-Q Local Address               Foreign Address             State       PID/Program name
tcp        0      0 0.0.0.0:3306                0.0.0.0:*                   LISTEN      24249/mysqld ←MySQL
tcp        0      0 0.0.0.0:22                  0.0.0.0:*                   LISTEN      1170/sshd
tcp        0      0 127.0.0.1:25                0.0.0.0:*                   LISTEN      1280/master
tcp        0     96 160.16.201.244:22           218.221.114.171:59267       ESTABLISHED 24915/sshd
tcp        0      0 :::80                       :::*                        LISTEN      24587/httpd ←Apache
tcp        0      0 :::22                       :::*                        LISTEN      1170/sshd
tcp        0      0 ::1:25                      :::*                        LISTEN      1280/master
Web画面の表示確認
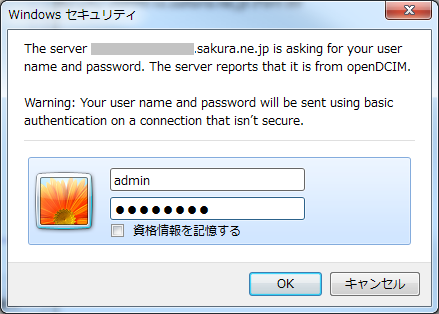
I.E.11を起動して、さくらのVPSで提供されている情報を確認し、「http://標準ホスト名/dcim/」もしくは「http://IPアドレス/dcim/」をURLに入力してアクセスします。 Apacheのベーシック認証の画面がポップアップで表示されますので、Apacheで設定したユーザとパスワードを入力して[OK]ボタンをクリックします。

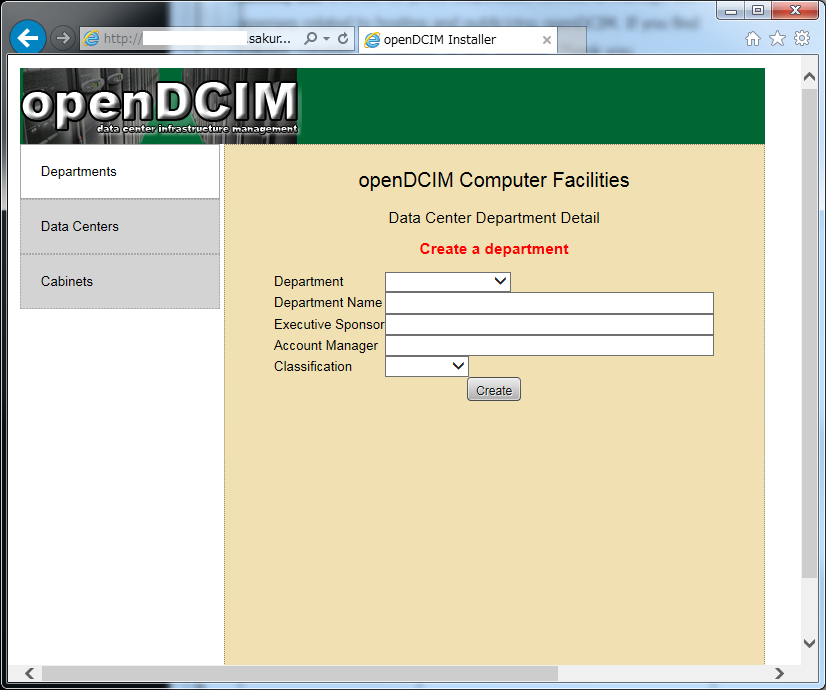
認証に成功し、以下のような画面が表示されたら一通り設定は成功しています。

その後はWeb画面上でデータセンタの情報等を設定していってください。 ここではopenDCIMの利用方法は割愛します。
